THE EYE WANTS TO TRAVEL – MASTER BATHROOM REVEAL

And so we have FINALLY completed our master bathroom, after a ridiculously protracted build with so many interruptions and delays, as is always the case with DIY operations! Without any further ado, let’s just get to the visuals showcasing the before, during and after, with as brief of an explanation of the process as is necessary to make sense of this rather convoluted project…haha!

So here is a “before” picture of the space where we decided to create our master bathroom. It’s essentially a 5 x 12 foot sliver of awkward real estate that runs parallel to our (unfinished) master bedroom and which meets the angled roofline of the A-frame. Confusing, I know. Because it was even more confusing to carve a functioning room out of this bizarrely configured area…haha! The other intrinsic challenge presented by this space is that it’s windowless, and as such, has a predisposition to feeling a bit cavernous. But as we’ve been renovating our modified A-frame for a few years now, we are more than used to confronting unusual architectural situations and figuring out a way to maximize each potential square foot.

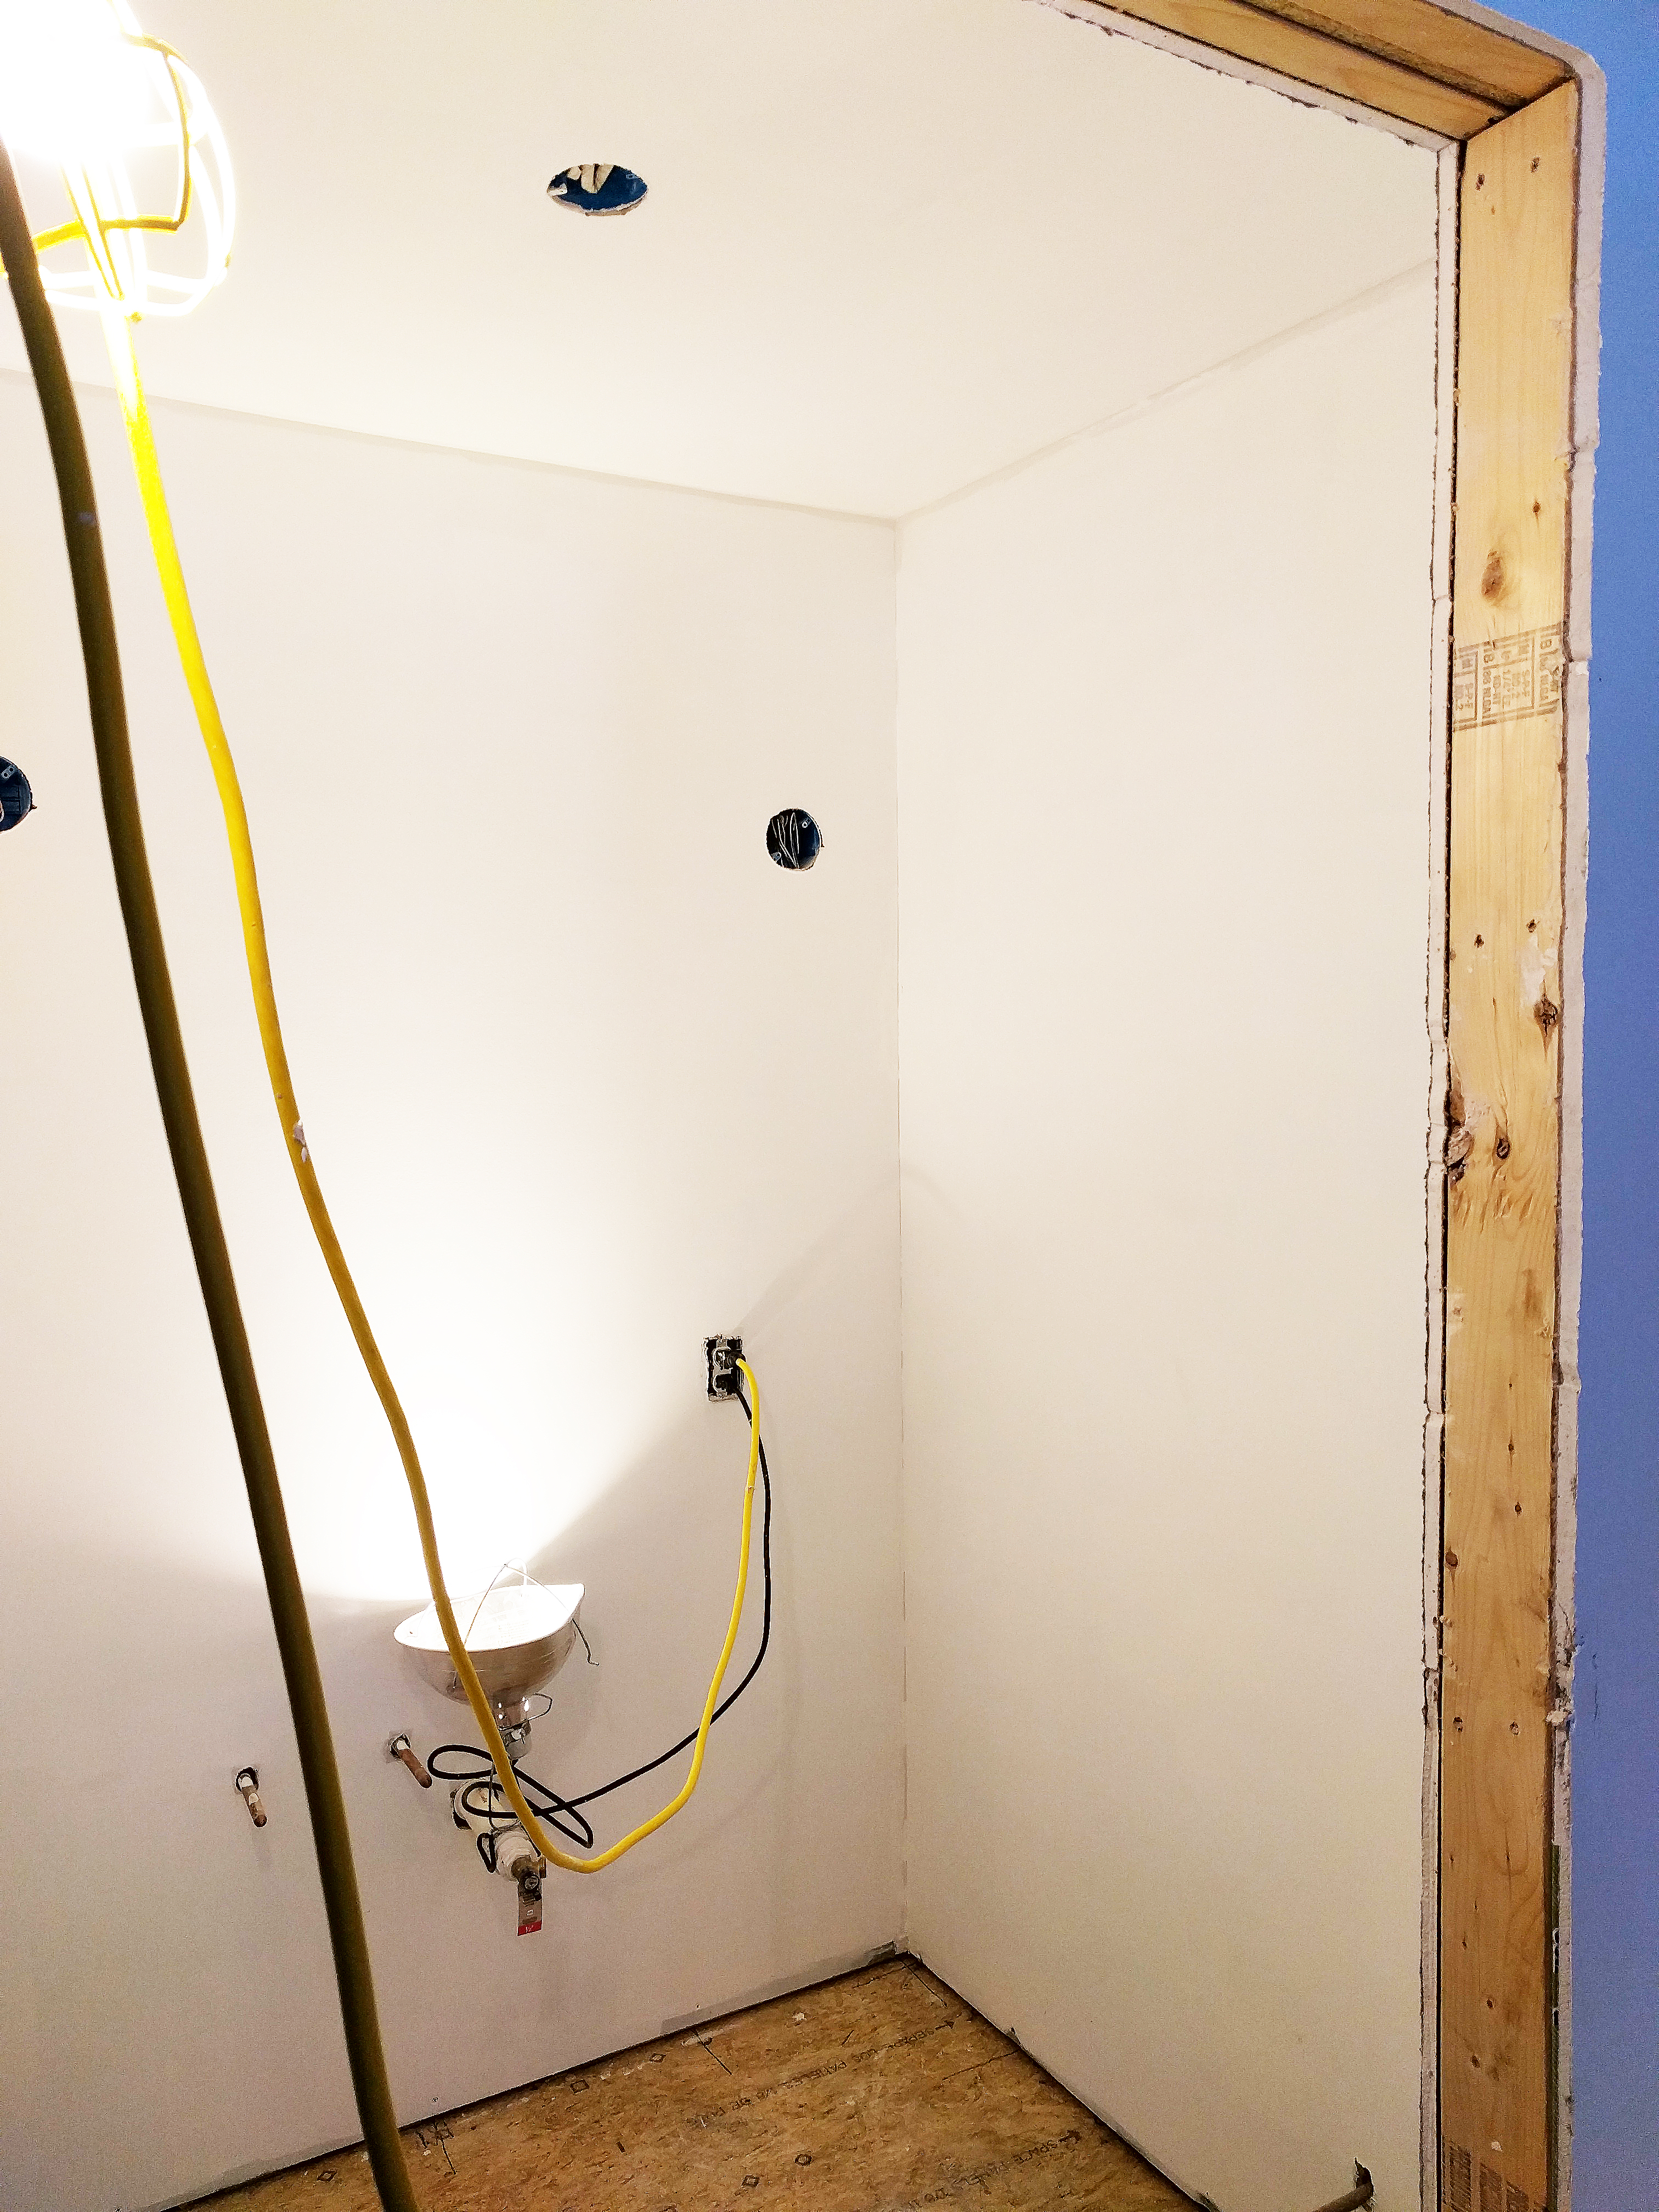
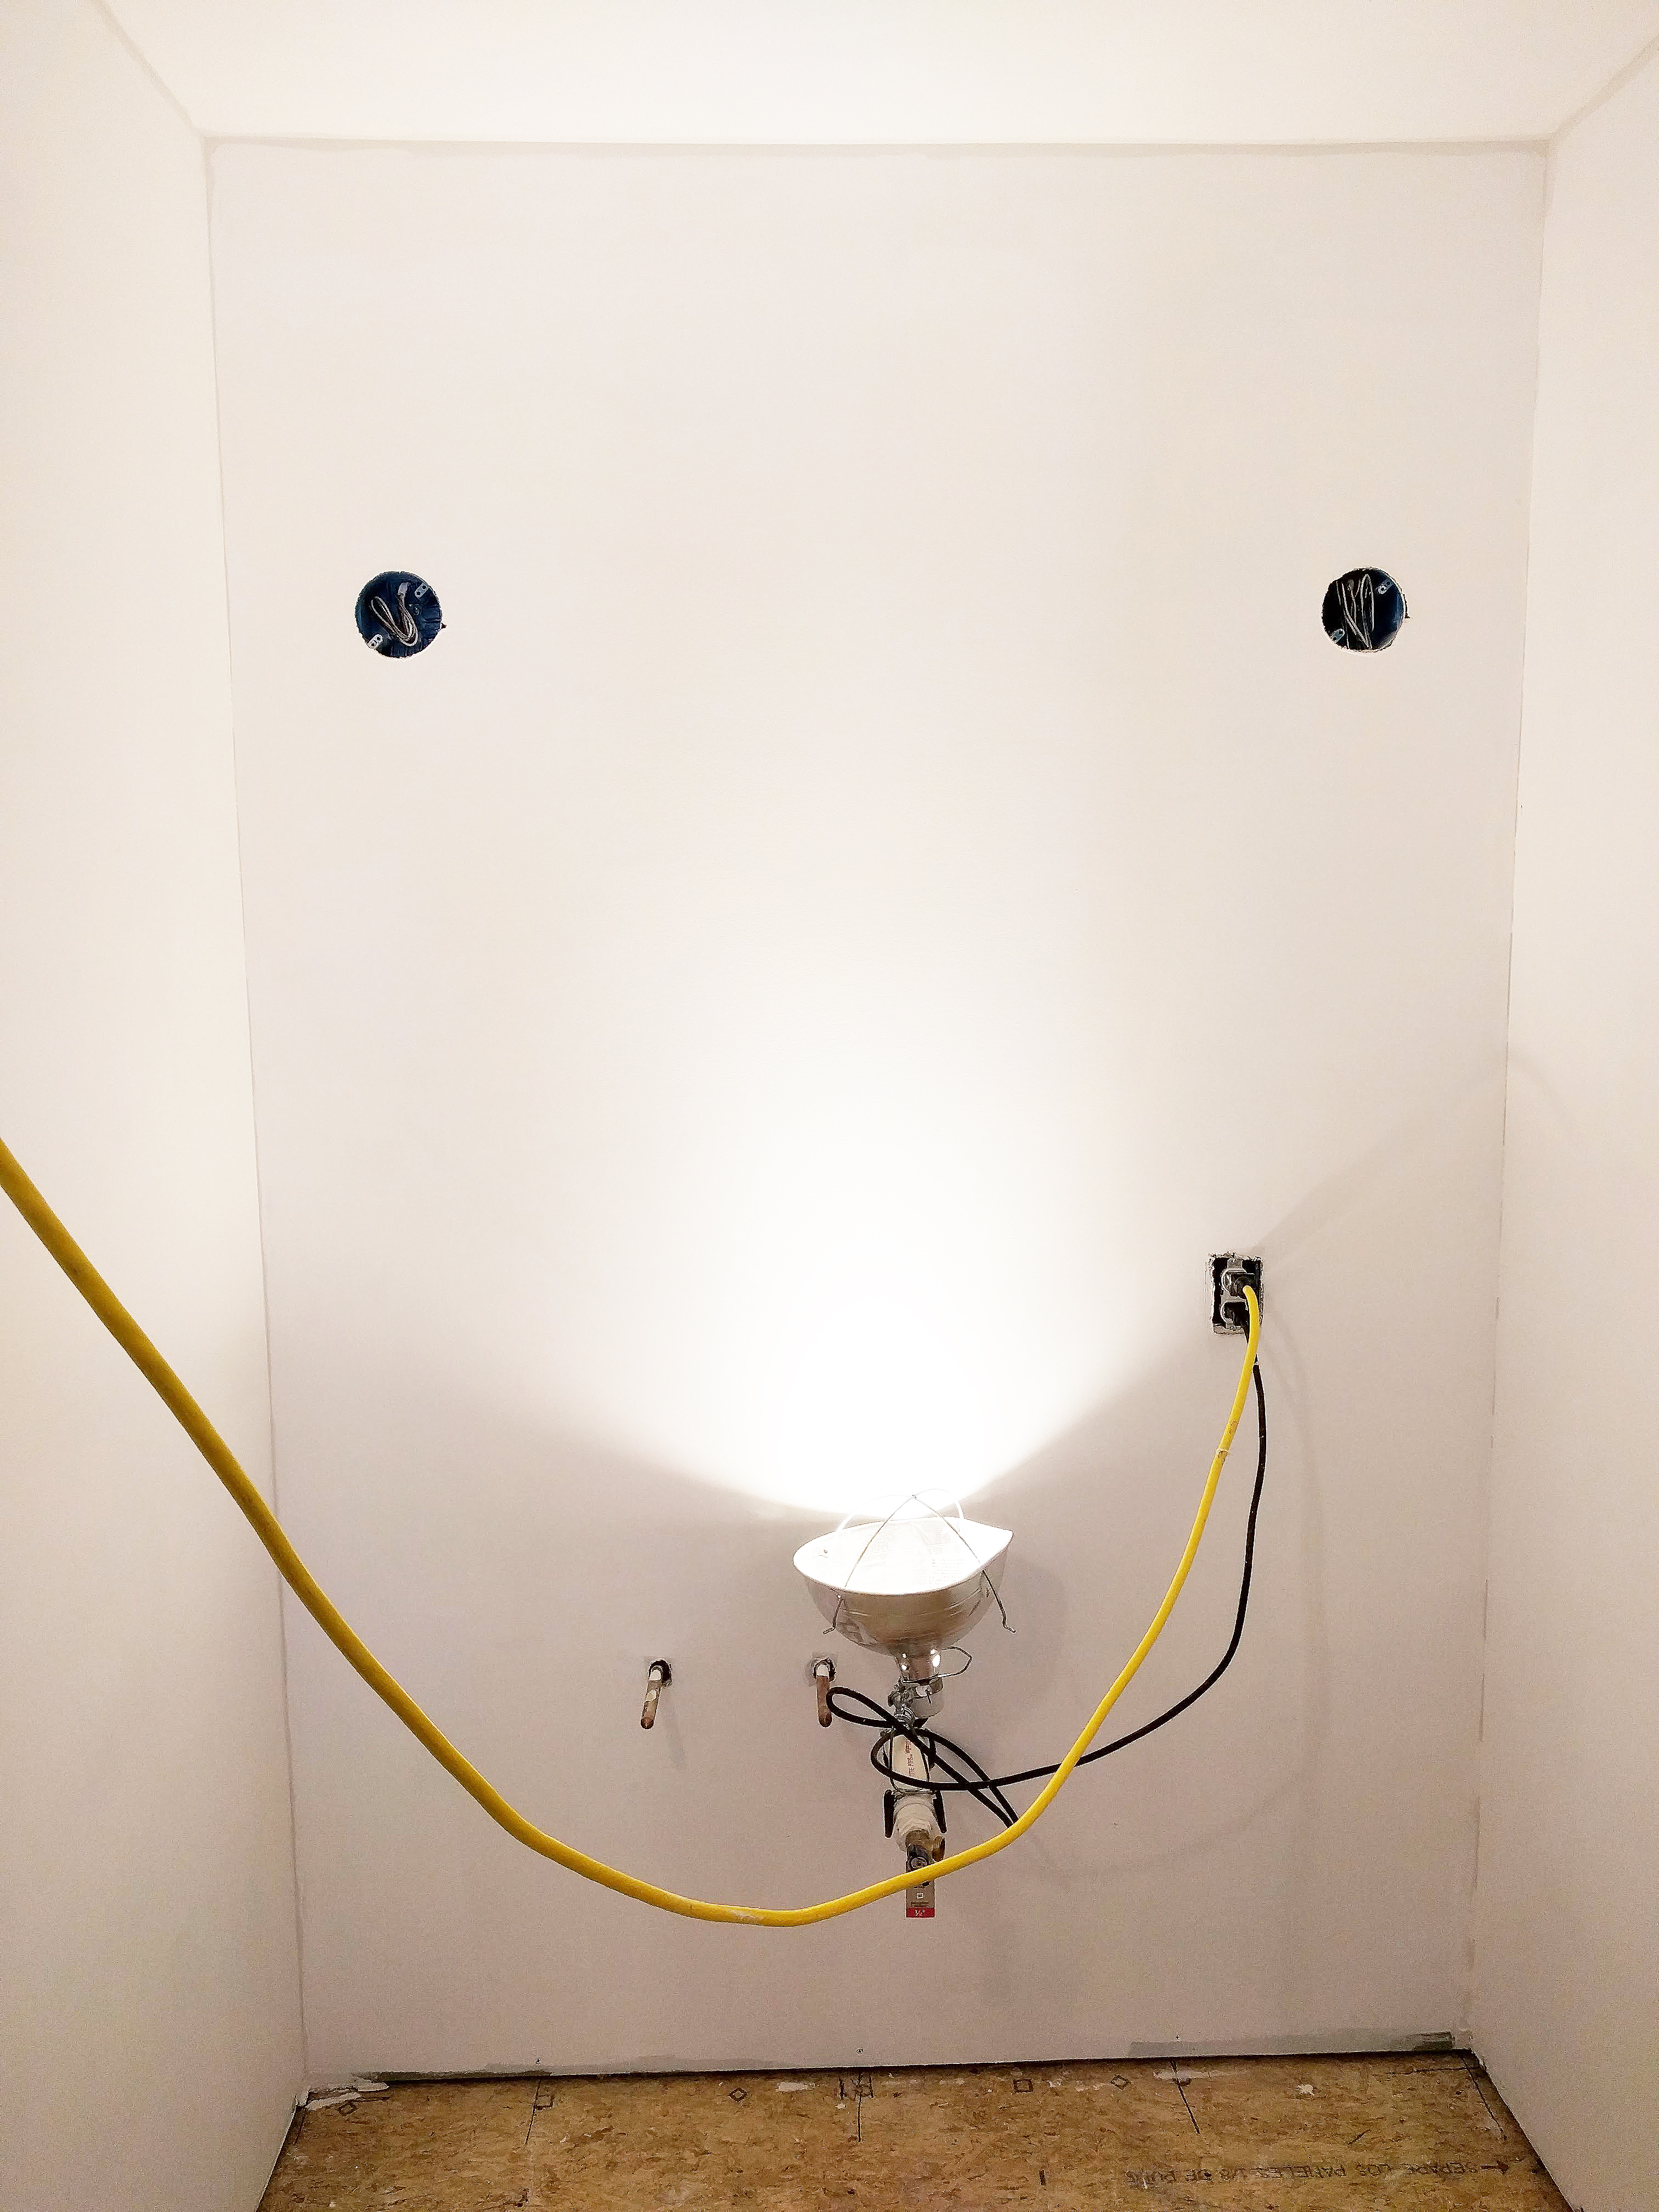
This is the space in a rather early phase, down to the studs. At this stage, we had already inserted the tub and tiled the surround though, as well as completed the electrical installation and plumbing rough ins.

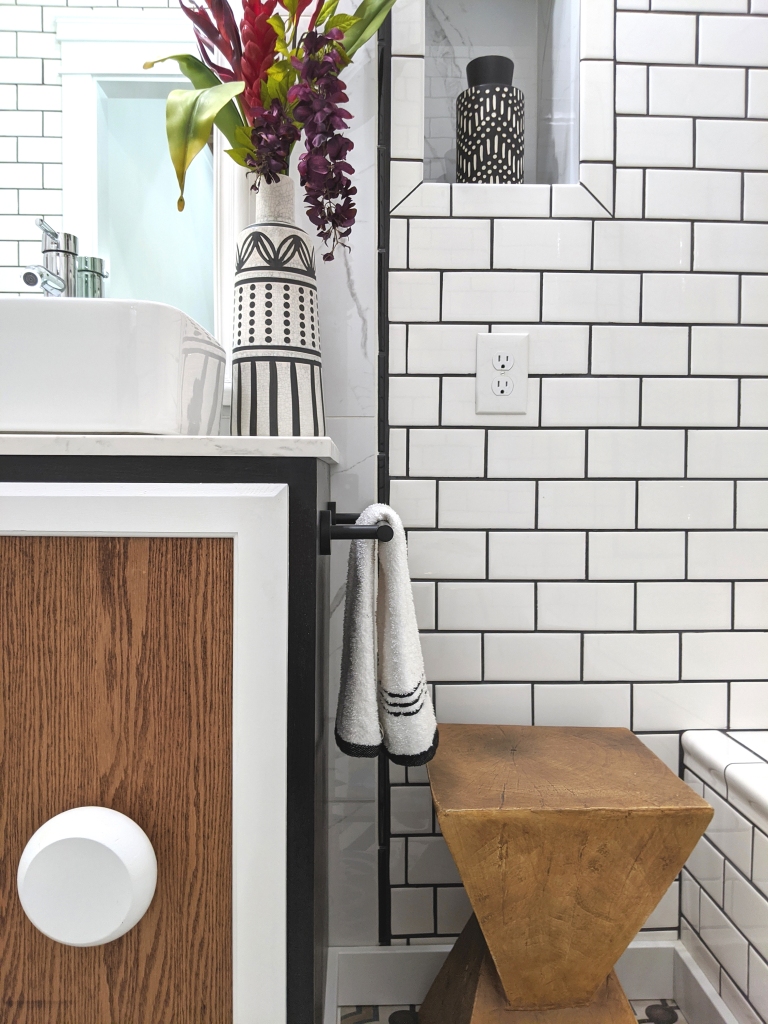
In the above photo, you can see the steeply angled roofline of the A-frame on the left, and how this space is contiguous. We decided to plumb out the walls and take advantage of the unused cavity by creating some recessed wall niches as well as an inset storage cabinet.

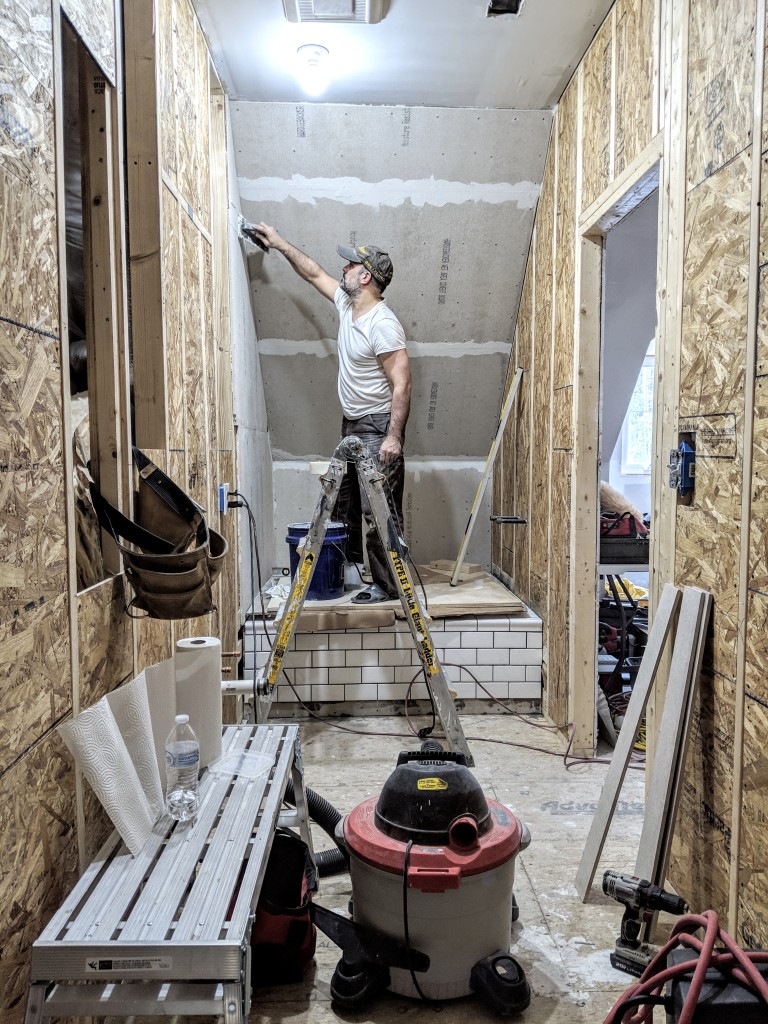
And so the real construction begins! Walls are sheathed and up goes the cement board as the plan is to tile the entire bathroom, from floor to ceiling.

Building out the recessed niches and inset cabinet between the A-frame roof and the bathroom walls in what is possibly one of the most unforgiving work spaces…haha! Honestly, I can’t even begin to describe the extent of the construction weirdness we encounter here on the daily.

Making some headway…

Here, things have started to take some shape, as the cement board has been fully installed and the tiling has commenced. Ah the joys of endless tiling…

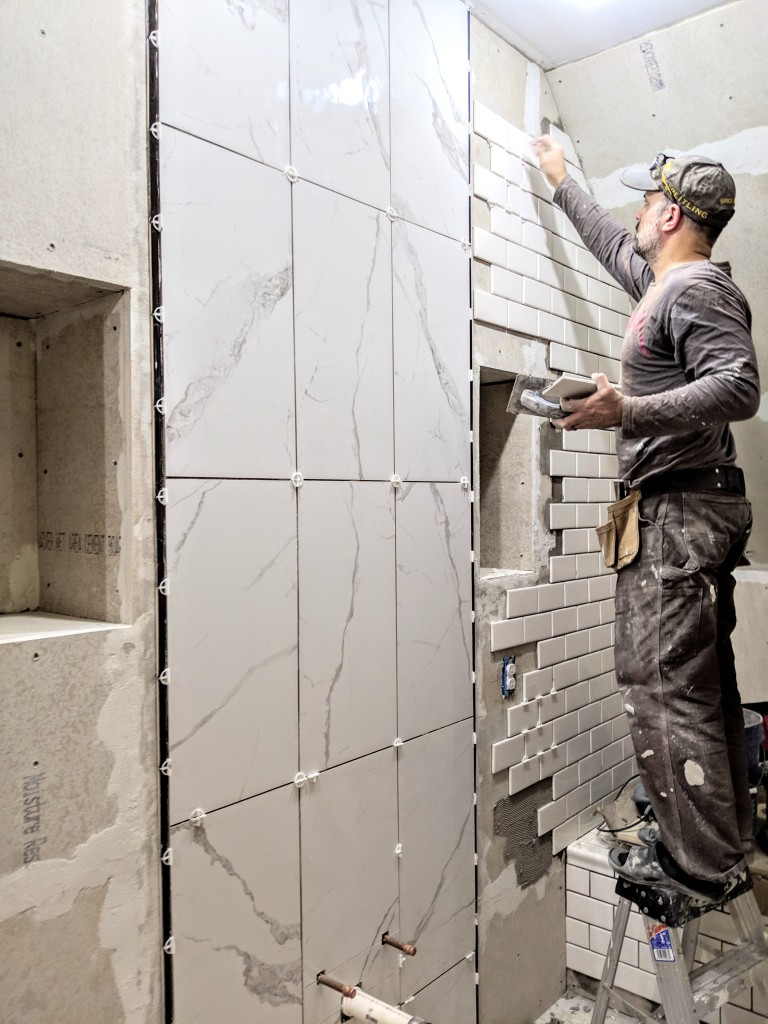
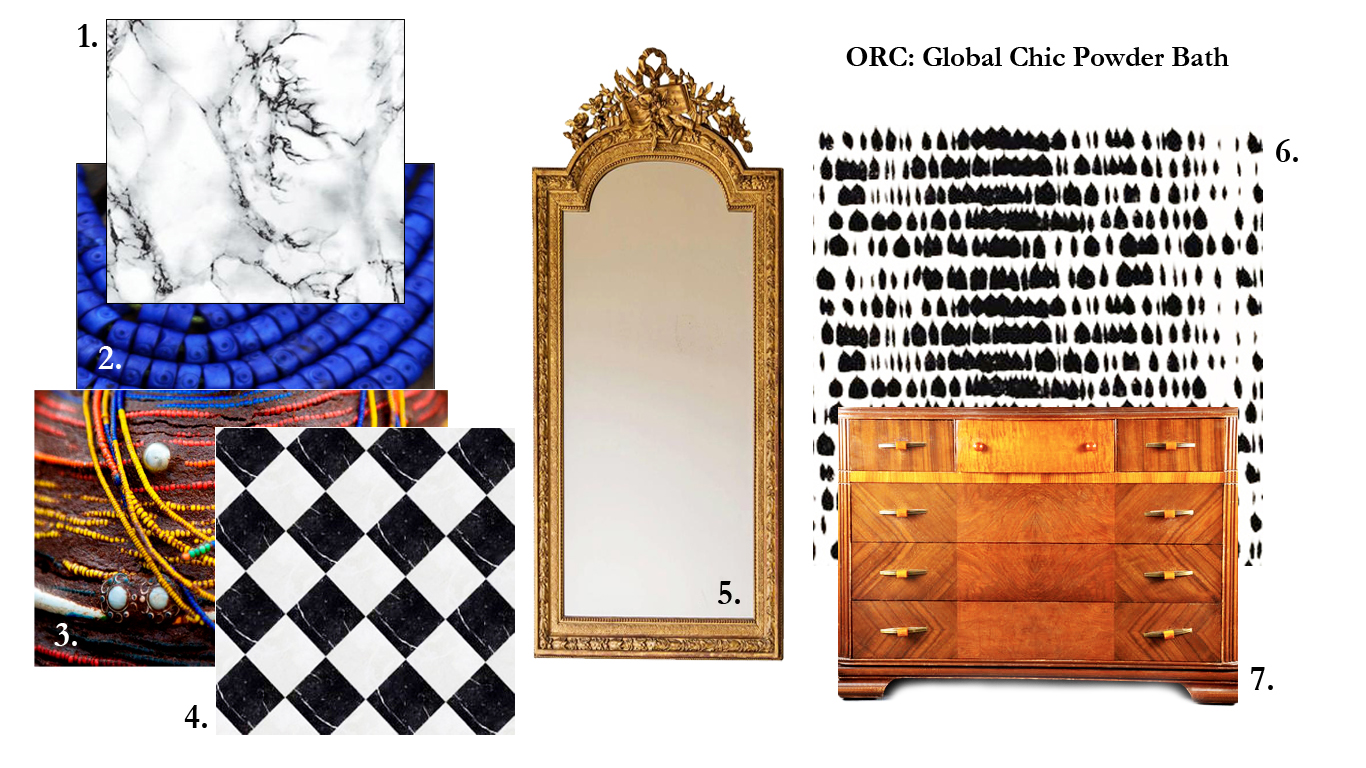
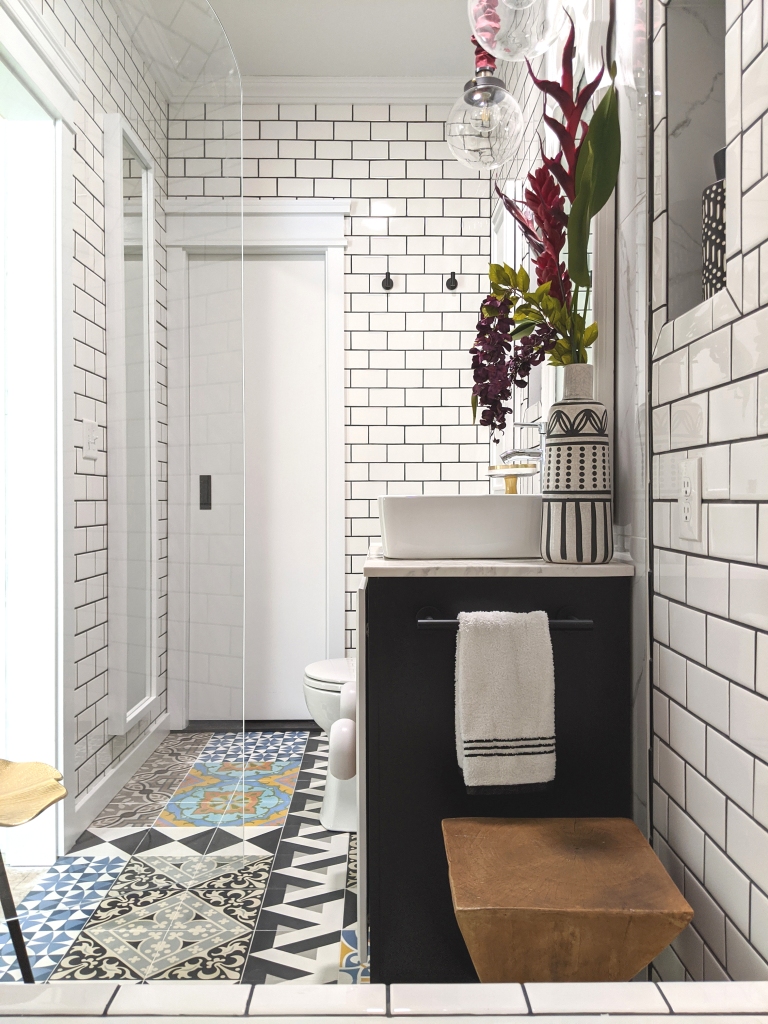
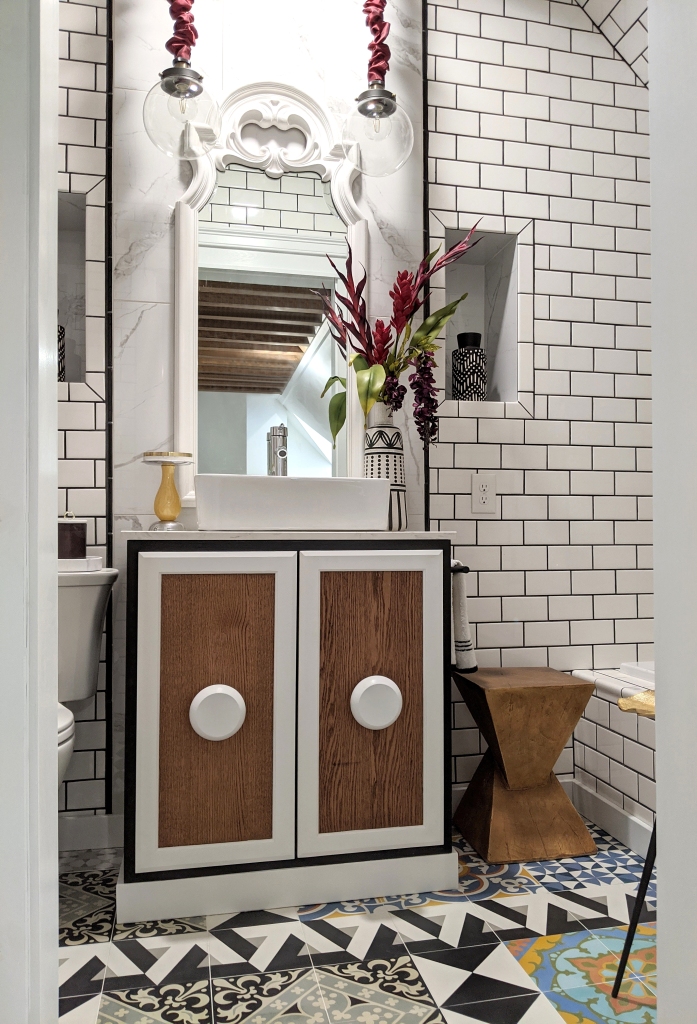
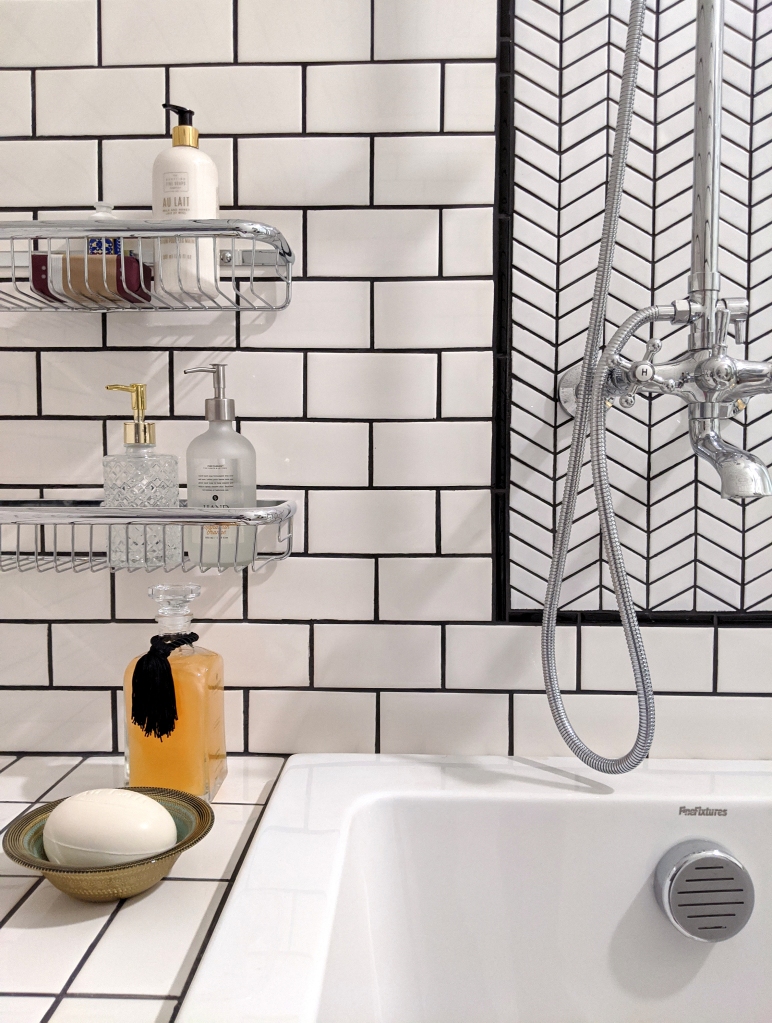
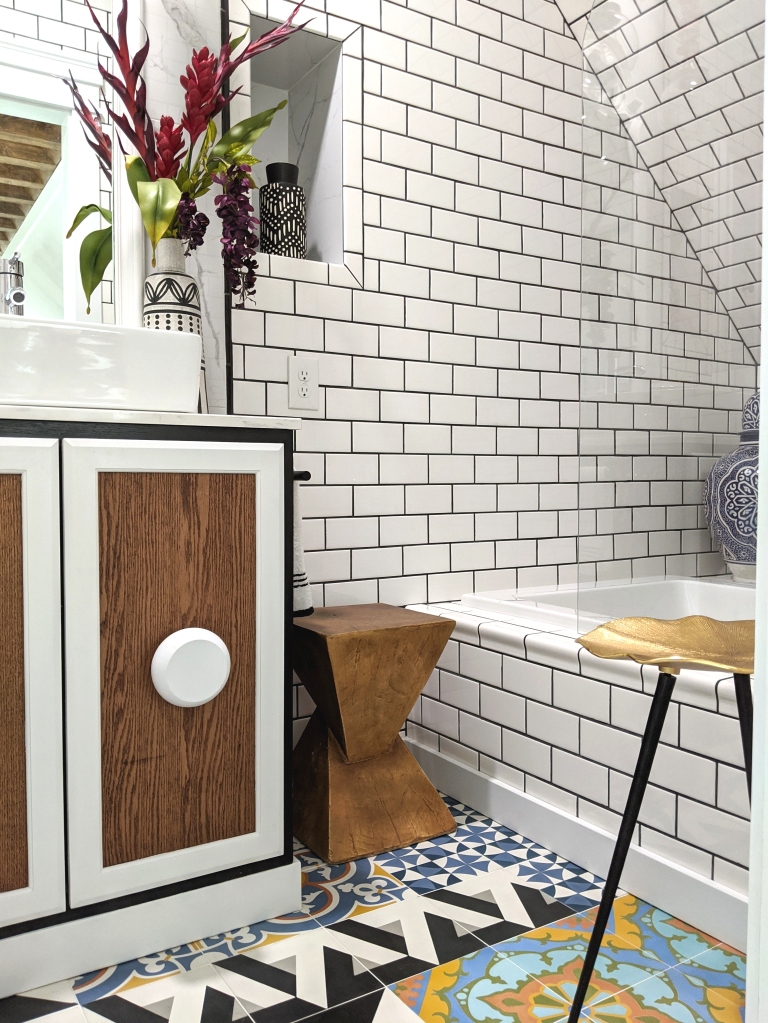
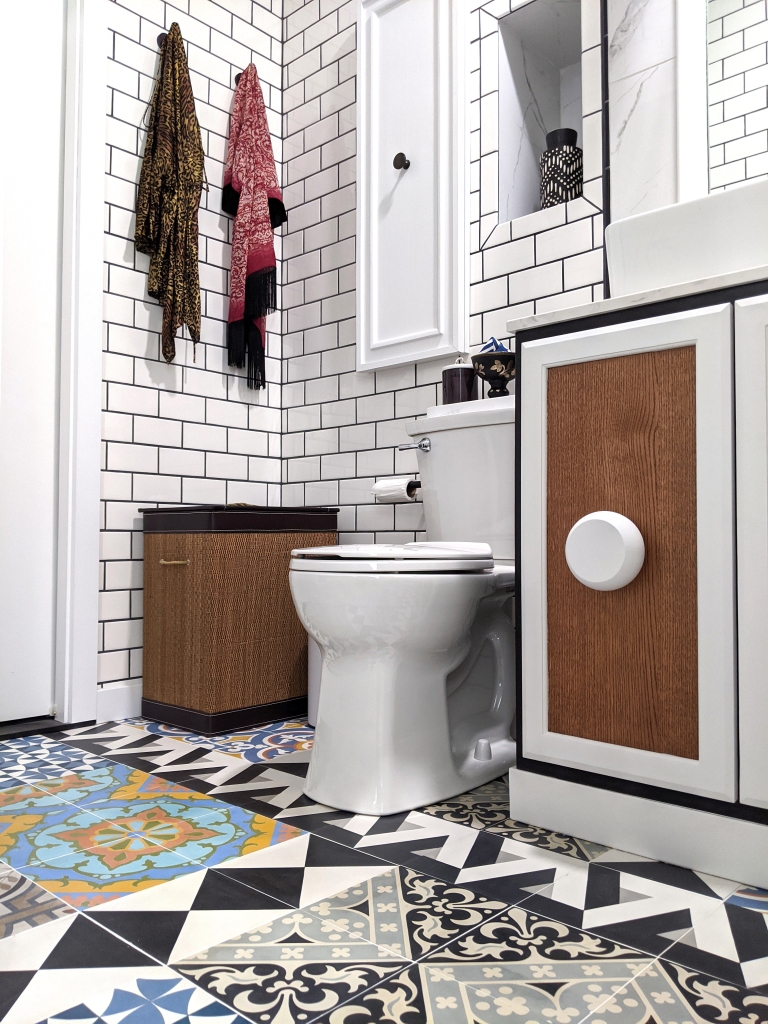
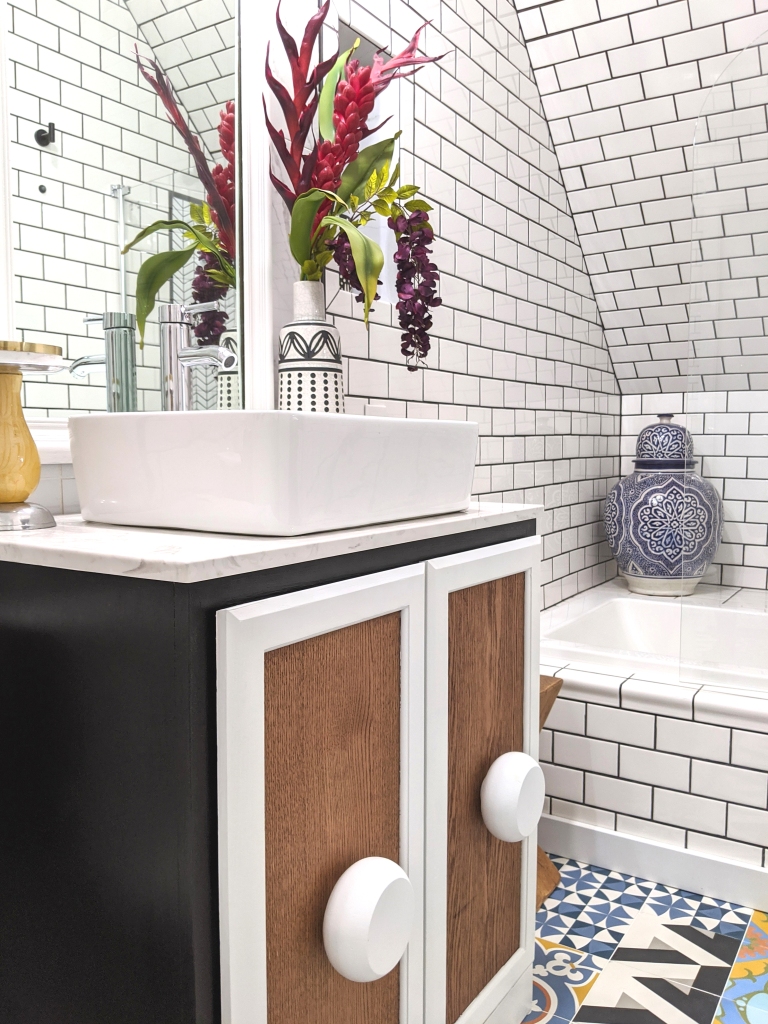
Because the bathroom has no natural light source, I opted for white subway tile and marble panels throughout (with the occasional black trim detail) so as to keep the space from feeling too much like a dungeon. I ultimately wanted this bathroom to feel elegant and airy despite its obvious limitations, but with a deliberate injection of drama because that’s just how I like my interiors. And I truly believe that small spaces, bathrooms especially, benefit from a well administered dose of the dramatic!

Oh, and if you’re curious as to how and where we have our tools set up while we work, let us please have a collective moment of silence for the sad, sad state of our (future) master bedroom. Which continues to serve us well as a makeshift construction yard…haha!

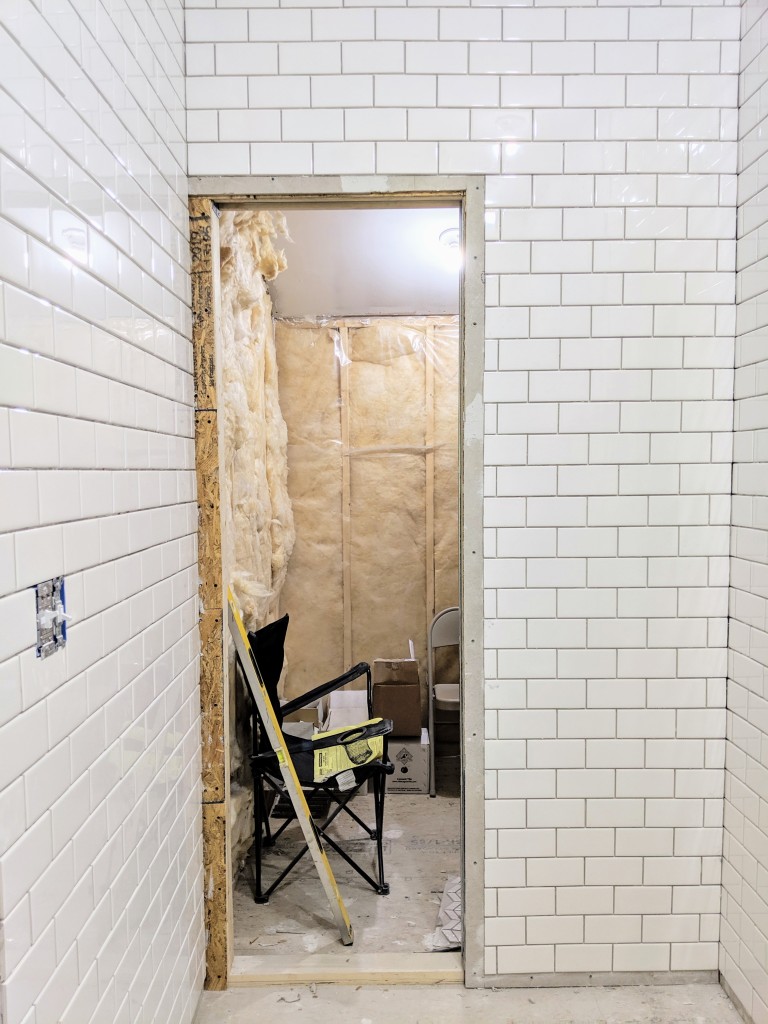
The entry to the master bathroom from our bedroom will feature a sliding door, and the bathroom will eventually lead to our dressing room/closets in the future. I know, more architectural confusion, but that’s par for the course when dealing with a modified A-frame. All this to say that we had to add a pocket door to the back end of the bathroom in order to eventually access other parts of the house. In the foreground, you can see where the framework has been added to accommodate the pocket door.

This is the view from the bathroom into the adjoining space which will eventually lead to our closet areas, right before we installed the pocket door.

So moving on from the mundanity of walls and thresholds…haha! We decided to customize a standard pine cabinet from Lowe’s to create a vanity of our own design…

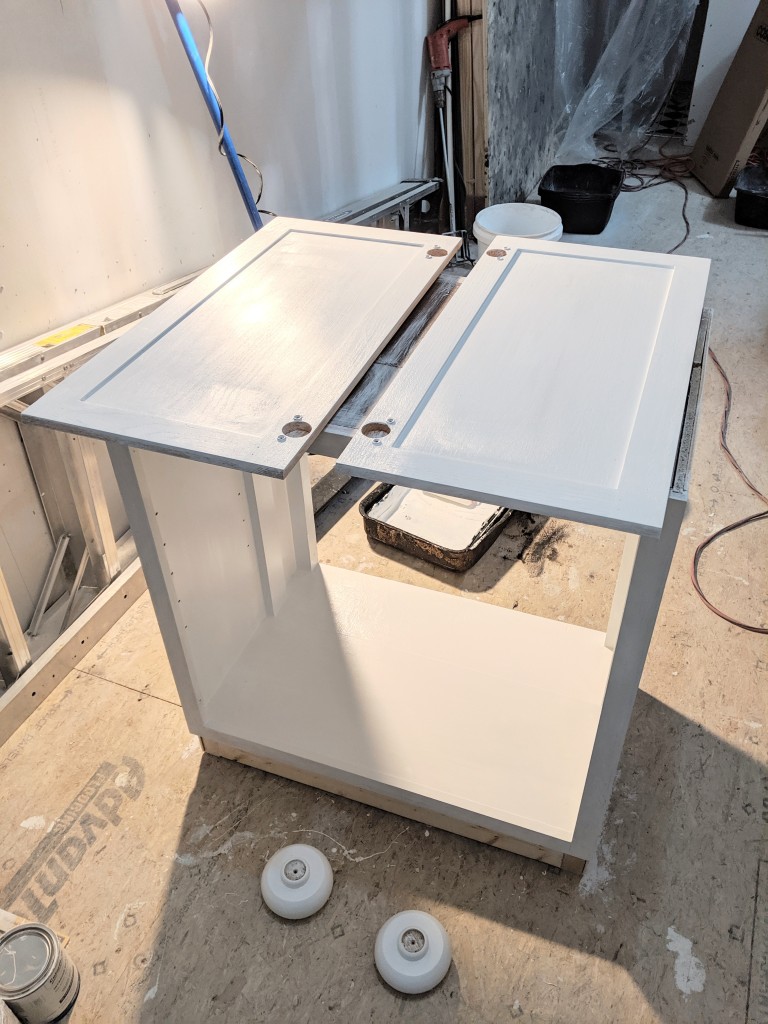
Which evolved into this…

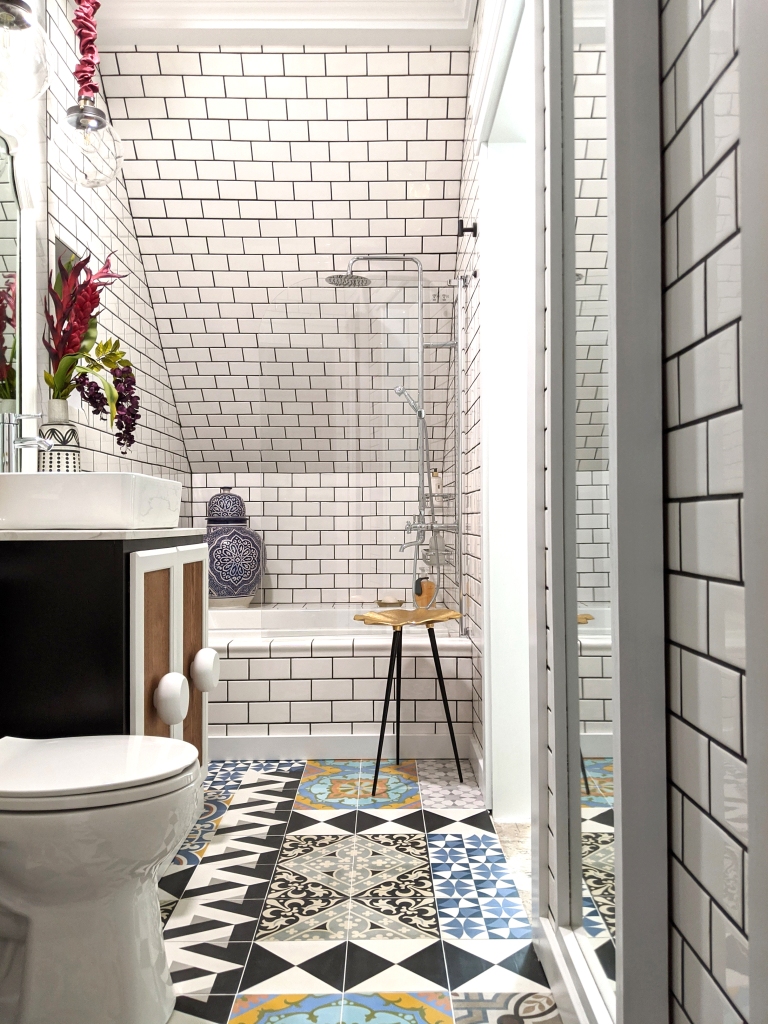
And the flooring was where I wanted the room to show its personality, or should I say, evoke my heritage in a visually symbolic way. Being Portuguese, I have always been enamored with the artisanal beauty of our beloved tile tradition. And despite now living in the woods of New Hampshire, I wanted to be reminded daily of my first home, with its cacophony of colorful tiles, which despite their roots in history, still present beautifully in modern settings. So we used a variety of cement tile patterns, from the riotously chromatic to bold black and white, to create an abstract floor mosaic which would bring life to the space. I wanted this weird, little bathroom to be a sort of glamorous and exotic, old world meets new world refuge because, as we all know, the eye wants to travel…at least mine does!

So here is our master bathroom, after all was said and done! I plan on having it professionally photographed in the future, but for purposes of this reveal, my less than optimal cell phone shots will have to do!

This is the long view, taken from behind the pocket door. This perspective gives an idea of the long, narrow shape of this space with the angled wall area where we incorporated the tub and shower.
There are no words for how much I absolutely ADORE this blue Moroccan urn which I purchased from my friend Meg, purveyor of global goods extraordinaire at Tierra del Lagarto … I have to give this amazing shop a shout out for being the most impressively vast resource for decorative wares sourced from all around the world!
The long view from the other side of the bathroom, taken while crouched in the bathtub…haha! Here you can see the fully installed pocket door. The generously sized mirror was a fortuitous salvage find which we framed out and mounted on the wall, and which also helps to bounce light around in this tight space.
We had a thin, marble slab cut for our bathroom vanity, which we topped with a deep, rectangular vessel sink. The mirror was an upcycled, thrifted find from many years ago which has previously lived in other parts of the house, but has now found its permanent home here. Love the ornate detailing and its juxtaposition against the sea of marble and subway tile.
This is the view as you enter from the master bedroom. Currently working out the sliding door situation which will provide privacy!
Some shower details. For decorative effect, we created a chevron-patterned panel to highlight the shower fixture.
Another perspective of the entry. You can see reflections in the vanity mirror of the beam work we’ve working on in the master bedroom. Always juggling a million and one projects around here!
More details. The geometric, wooden accent table (yet another lucky, thrifted find!) is perfect for stacking towels and clothing while soaking in the tub.
We installed a rounded, glass shower door in our tub enclosure. I’ve never been a big fan of shower curtains, and in this case, the bathroom feels infinitely more open with the advantage of the material’s transparency.
Visual moments are all in the details, right? The marble-clad niches make me so incredibly happy, as they provide additional storage and dimension to the walls!
Another layout view, this time from where the toilet is positioned…haha! Here you can see the traditional shower fixture and how we highlighted its placement with the decorative tile panel.
We created a dynamic floor pattern using a variety of bold cement tiles from Villa Lagoon. (Not sponsored, but thought I would disclose the source in case someone was curious!) Great company, with beautiful and well-priced inventory!
I sheathed the orb pendant lights with silk chain covers in a wine color. I absolutely love the tactile and romantic quality it lends to what is an otherwise modern light fixture!
Here is our inset wall cabinet, which has deep storage for stashing towels, toiletries, etc. We also mounted a pair of hooks on the adjacent wall for hanging robes and/or towels.
Partial view of the interior of the inset wall cabinet and niche.
The back (and most practical) end of the bathroom, where we placed a hamper (and trash can, which is essentially obscured in the photo by the toilet).
Customized vanity close-up. We designed it to be a functional but whimsical statement piece in the space, with a nod to art deco design.
Mirror reflections. And that gorgeous blue urn, which was THE perfect treasure to animate and anchor this corner!

And there you have it! Thanks so much for stopping by and accompanying our journey as Brian and I continue to tackle the final spaces in our home. Up ahead…three bedrooms…wish us luck as we try to keep our sanity intact amidst the renovation chaos…haha!

*Images and text by Astrid Insieme

ONE ROOM CHALLENGE – WEEK 5

We’re in the homestretch of the Spring 2018 One Room Challenge, with only a week left before the final reveal!

So let me quickly catch you up on what we’ve been doing in our little powder room since the last post. Basically, we’ve been tending to the final installations of all the disparate elements to pull the space together. This past Sunday, our plumber took care of installing the following:

Our new Kohler toilet (purchased at Lowe’s), which ended up being a perfect fit in our tiny half-bathroom. She was pricey, but so worth it!

TOILET

As well as our glorious new sink and faucet, which I had sourced years ago in preparation for this eventual room:

SINK

I can’t even properly express how much I love this vessel sink! It is absolutely GORGEOUS! As well as this antique brass faucet, with its chic, bamboo design:

FAUCET

I found a matching toilet paper holder and towel rod (on Amazon) with an antique brass finish which is extremely similar to that of the faucet. Thankfully, they just arrived the other day and were installed last night. I really love how minimal and understated they are, while still evoking a bit of a glamorous feel:

TOILET PAPER HOLDER

(These are the stock product photos from Amazon, obviously…haha!) We ended up installing the towel rod on the side of the wooden vanity as opposed to the wall, as you’ll see in the final reveal!

TOWEL BAR

We also installed the mirror, as well as the lighting. For the overhead light, I purchased an art deco-inspired flush mount fixture (Amazon to the rescue, once again!) with antique brass detailing and a low profile:

PENDANT FLUSH MOUNT

And the two wall sconces, which I’ve shown you before, were also finally installed:

wall sconce

But prior to installation, these guys got a bit of a facelift, as I wanted to infuse them with a bit of drama, color, and global flavor. I had a collection of wooden beads from India which I decided would be ideal to embellish the sconces with:

BEAD CRAFTING 02

BEAD CRAFTING 01

And I’m afraid that’s all I can show you at the moment! Check in next week to see the final reveal…I’m so incredibly excited to address the final details and start shooting in there!


ORC-Guest-400x218


ONE ROOM CHALLENGE – WEEK 1

So I’ve recently decided to join up as a guest participant in the Spring 2018 One Room Challenge, hosted by Lisa of Calling it Home and House Beautiful as their media partner! I’ve always watched from the virtual periphery as legions of talented designers (including both the featured and guest participants) embarked on this six week-long adventure, twice a year, working their unique magic in a single room of their choice. Since my husband, Brian, and I are in the midst of an endless remodel of our property – having initially renovated both the interior and exterior of our A-frame ourselves, and subsequently adding on a rather substantial addition which we are currently in the throes of doing the finish work on – I figured it would be fun to enlist in this collective design challenge and document the transformation, from beginning to end, of one of the rooms in the addition. We’re currently working on several areas in the downstairs, simultaneously, but for the One Room Challenge, we will be focusing on the teeny tiny powder room on that level.

At a whopping five by five feet in dimension, this little half-bathroom truly deserves to be bold and beautiful! Personally, I adore striking, statement-making bathrooms and have always envisioned this powder bath to be a jewel-box of sorts, fusing elements of the traditional and global with an eclectic and glamorous touch. Sounds slightly insane, perhaps, but that’s how I like my interiors. To be a bit unconventional and surprising in terms of their aesthetic overlaps.

So here is the space in question, in all of its crude and basic glory, with absolutely nothing to boast of other than unpainted drywall, sub-flooring, and its electrical and plumbing rough-ins:

powder room before 1

powder room before 2

powder room before 4

This is what needs to happen in here over the course of the next several weeks:

  • install cement board and marble floor tiles
  • prime and paint walls, as well as decide upon and execute finished wall treatment
  • source and install customized cabinet as vanity
  • install baseboard, trim, door and marble threshold
  • install cultured marble slab atop vanity
  • install sink, faucet, toilet and tie up any and all plumbing issues
  • source and install mirror
  • source and install two wall sconces and flush mount ceiling light
  • source and install towel rod and toilet paper holder/rod

I’m sure I’m missing something, and it’s possible that other considerations will arise as the project progresses, but that is the gist of the work involved. Admittedly, this is such a tiny room that I don’t foresee any serious and/or unexpectedly difficult issues emerging, and am just really looking forward to seeing this space unravel into something special!

Here’s a quickly thrown-together mood board which illustrates a bit of the “look and feel” I’ve long envisioned for this powder room. I actually don’t ever create concept boards when designing rooms in my own home (the ideas have usually been marinating for eternity in my decor-obsessed brain…haha!), but for the sake of documenting this process properly, I’ll show you what I have in mind:

moodboard 2

So let me break this down a bit…

  1. Gray and White Cultured Marble Slab from Home Depot. For the vanity top. Already ordered, not yet delivered.
  2.  I’m looking for two, dramatic wall sconces which incorporate both metal and chunky wooden beads. And I intend to customize these elusive and impossible to find lights with additional beading in striking hues to add a bit of global intrigue.
  3. (see 2. above)
  4.  The floor will be tiled in classic black and white marble, in a traditional harlequin pattern. Tile from Home Depot has already been ordered, delivered and is ready to go.
  5. Seeking an ornate, gilded mirror of baroque or neoclassical persuasion. This particular example came from 1stdibs and is apparently worth more than the GDP of several countries on this planet.
  6. The Queen of Spain wallpaper from Schumacher has long been a favorite of mine because I absolutely adore its graphic, high-contrast motif. My plan is to actually paint or block-print a bold pattern myself on the walls, so I am merely including this beloved wallpaper as a source of visual inspiration.
  7. Been scouring my local Craigslist (where I found this beauty) for an art deco, waterfall style cabinet to customize into the vanity for the sink. Fingers crossed it’ll be the one!


And the projected basic layout of the 5′ x 5′ room:

bathroom floor layout


As for the particular sink (it’s a black vessel sink featuring concentric tribal etchings around the circumference…it’s really unique!) and faucet (gilded and bamboo-like) that we’ll be using, both were sourced YEARS ago for this very purpose. And are currently packed away, somewhere deep in the recesses of the twenty foot shipping container/eyesore which is parked in our driveway as we finish all of the construction work on our property. But we’ll be unearthing them soon enough! And also, we have to source a toilet with a small footprint, as well as a flush mount ceiling fixture. Preferably sooner than later.

That’s pretty much the lowdown of what the plan is for this space…stay tuned for more next week! And be sure to check out the other participants on the official One Room Challenge page!


ORC-Guest-400x218